最近開始研究CUDA,準備做演算法加速, 因此生出這篇筆記。因 CUDA 是叫用 nvcc 進行編譯,CUDA 函數無法被C# 這種 managed code 直接呼叫,在同一個 CUDA 專案中只能用C或C++來呼叫 CUDA,因此必須在 CUDA 專案中加一個 C/C++ 的 wrapper 函數,將 CUDA 專案包裝成 C 語言的DLL檔,然後在 C# 中用 DllImport 呼叫 C 函式來轉給 CUDA 計算。以下實作以 Visual Studio 2017 Community CUDA 9.2 SDK為例,完整程式碼在https://github.com/ghostyguo/CudaDotNet。
建立Cuda/C++ DLL程式庫
先建立一個名稱為CudaDotNet空白Visual Studio方案:

在 CudaDotNet方案下, 建立一個名稱為CudaKernel的CUDA專案, 它會自動產生一個 kernel.cu檔:


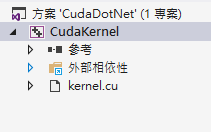
完成後的方案總管:
先測試 CUDA環境是否正常, 先改寫一下kernel.cu 的 main(), 加一行 getchar() 讓他執行完畢後可以暫停:
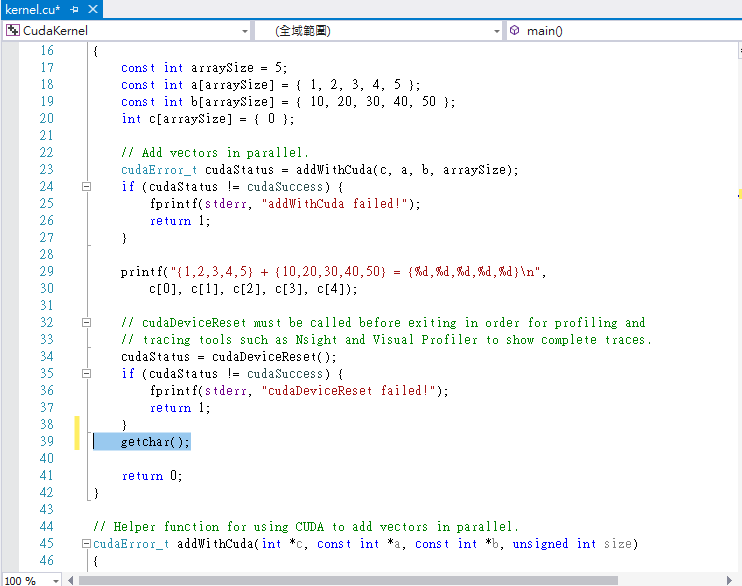
編譯後執行, 能看到結果, 表示CUDA環境正確:

之後我們要將這個 CudaKernal專案打包成 DLL, 之後用不到 main(), 而addWithCuda()
函數無法在
DLL輸出到 stderr, 因此這裡先把 main()
與
addWithCuda() 裡面的所有 fprintd(stdrr,…) 註解掉或刪除:

在 CudaKernel專案新增一個 Visual
C++的
CudaKernel.cpp 檔:

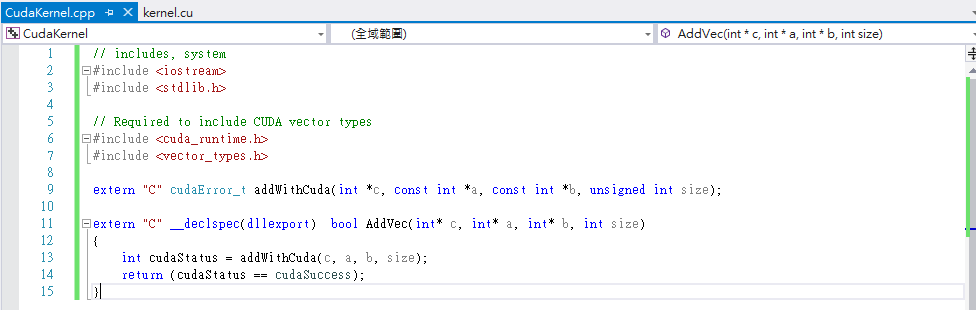
參考剛剛的kernel.cu, 輸入以下程式碼,
這個 AddVec() 函數是要在產生的 DLL 內提供C#程式呼叫使用, 它會幫忙轉去呼叫由Cuda執行的 addWithCuda()函數:
#include <iostream>
#include <stdlib.h>
#include <cuda_runtime.h>
#include <vector_types.h>
//#include <helper_cuda.h>
#define DLLEXPORT __declspec(dllexport)
extern "C" DLLEXPORT cudaError_t
addWithCuda(int *c, const int *a, const int *b, unsigned int size);
extern "C" DLLEXPORT bool AddVec(int* c, int* a, int* b, int size)
{
cudaError_t
cudaStatus = addWithCuda(c, a, b, size);
return (cudaStatus == cudaSuccess);
}
|
像這樣:
修改 kernel.cu, 將 addWituCuda()宣告前面也將加上 extern "C" :

完整程式碼如下:
#include "cuda_runtime.h"
#include "device_launch_parameters.h"
#include <stdio.h>
extern "C" cudaError_t
addWithCuda(int *c, const int *a, const int *b, unsigned int size);
__global__ void addKernel(int *c, const int *a, const int *b)
{
int i = threadIdx.x;
c[i] = a[i] + b[i];
}
extern "C" cudaError_t
addWithCuda(int *c, const int *a, const int *b, unsigned int size)
{
int *dev_a = 0;
int *dev_b = 0;
int *dev_c = 0;
cudaError_t
cudaStatus;
// Choose which GPU to run on, change this on a multi-GPU system,
cudaStatus =
cudaSetDevice(0);
if (cudaStatus != cudaSuccess) {
goto Error;
}
// Allocate GPU buffers for three vectors (two input, one output) ,
cudaStatus =
cudaMalloc((void**)&dev_c, size * sizeof(int));
if (cudaStatus != cudaSuccess) {
goto Error;
}
cudaStatus =
cudaMalloc((void**)&dev_a, size * sizeof(int));
if (cudaStatus != cudaSuccess) {
goto Error;
}
cudaStatus =
cudaMalloc((void**)&dev_b, size * sizeof(int));
if (cudaStatus != cudaSuccess) {
goto Error;
}
// Copy input vectors from host memory to GPU buffers,
cudaStatus =
cudaMemcpy(dev_a, a, size * sizeof(int), cudaMemcpyHostToDevice);
if (cudaStatus != cudaSuccess) {
goto Error;
}
cudaStatus =
cudaMemcpy(dev_b, b, size * sizeof(int), cudaMemcpyHostToDevice);
if (cudaStatus != cudaSuccess) {
goto Error;
}
// Launch a kernel on the GPU with one thread for each
element,
addKernel
<< <1, size >> >(dev_c, dev_a, dev_b);
// Check for any errors launching the kernel
cudaStatus =
cudaGetLastError();
if (cudaStatus != cudaSuccess) {
goto Error;
}
// cudaDeviceSynchronize waits for the kernel to finish, and returns
// any errors encountered during the launch,
cudaStatus =
cudaDeviceSynchronize();
if (cudaStatus != cudaSuccess) {
goto Error;
}
// Copy output vector from GPU buffer to host memory,
cudaStatus =
cudaMemcpy(c,
dev_c, size * sizeof(int), cudaMemcpyDeviceToHost);
if (cudaStatus != cudaSuccess) {
goto Error;
}
Error:
cudaFree(dev_c);
cudaFree(dev_a);
cudaFree(dev_b);
return cudaStatus;
}
|
設定CudaKernel專案的屬性, 將組態類型設定為動態程式庫dll, 以及CLR支援, 否則無法產生支援 .NET 的程式庫:

進行編譯, 即可得到 DLL檔。
建立C#專案

將Form1改名為MainForm, 並在畫面上增加一個名為 tbOutput的TextBox元件以及btnRun按鈕:


在專案中的參考中加入剛剛的DLL檔:

MainForm程式中一開始加入下一行:
using System.Runtime.InteropServices;
|
在MainForm類別一開始加入DllImport敘述:
[DllImport("CudaKernel.dll", EntryPoint = "AddVec")]
private static extern bool AddVec(int[] c, int[] a, int[] b, int size);
|
在btnRun的Click事件中加入以下程式碼,
完整程式碼如下:
using System;
using System.runtime.InteropServices;
using System.Windows.Forms;
namespace CudaUI
{
public partial class MainForm : Form
{
[DllImport("CudaKernel.dll", EntryPoint = "AddVec")]
private static extern bool AddVec(int[] c, int[] a, int[] b, int size);
public MainForm()
{
InitializeComponent();
}
private void btnRun_Click(object sender, EventArgs e)
{
int arraySize = 5;
int[] a = new int[] { 1, 2, 3, 4, 5 };
int[] b = new int[] { 10, 20, 30, 40, 50 };
int[] c = new int[arraySize];
bool result = AddVec(c, a, b, arraySize);
tbOutput.Text = "";
for (int i=0;
i<arraySize; i++)
{
tbOutput.Text += c[i].ToString() + " ";
}
}
}
}
|
將CudaUI設定為起始程式, 然後執行, 如果有碰到以下錯誤,
是因為編譯平台選項設定的關係:

打開 CudaUI專案的屬性設定, 將平台設定成與CudaKernel相同即可 (這裡是用x64):

成功的畫面:


沒有留言:
張貼留言